NexT 主题,在主题配置文件中,找到 back2top 和 reading_progress 并进行配置即可。
1 2 3 4 5 6 7 8 9 10 11 12 13 14 15 16 17
back2top: enable:true# true 开启返回顶部 # Back to top in sidebar. sidebar:false # Scroll percent label in b2t button. scrollpercent:false# 是否显示滚动百分比
# Reading progress bar reading_progress: enable:false# 关闭阅读进度条 # Available values: left | right start_at:left# 进度条从哪侧开始 # Available values: top | bottom position:top# 进度条设置位置 reversed:false color:'#37c6c0'# 进度条颜色 height:3px# 进度条的宽度
Github 图标显示
Github 图标默认显示在右上方。
1 2 3 4 5
# `Follow me on GitHub` banner in the top-right corner. github_banner: enable:false# 是否显示 permalink:https://github.com/yourname# github 地址 title:FollowmeonGitHub# title 名称
# Sidebar Avatar avatar: # Replace the default image and set the url here. url:#/images/avatar.gif # If true, the avatar will be displayed in circle. rounded:false# 是否使用圆形 # If true, the avatar will be rotated with the cursor. rotated:false# 是否在鼠标放置时旋转图片
首页背景
修改主题配置文件,去除 style 前面的 #
1 2 3 4 5 6 7 8 9 10 11 12 13
# Define custom file paths. # Create your custom files in site directory `source/_data` and uncomment needed files below. custom_file_path: #head: source/_data/head.njk #header: source/_data/header.njk #sidebar: source/_data/sidebar.njk #postMeta: source/_data/post-meta.njk #postBodyEnd: source/_data/post-body-end.njk #footer: source/_data/footer.njk #bodyEnd: source/_data/body-end.njk #variable: source/_data/variables.styl #mixin: source/_data/mixins.styl style:source/_data/styles.styl
# Social Links # Usage: `Key: permalink || icon` # Key is the link label showing to end users. # Value before `||` delimiter is the target permalink, value after `||` delimiter is the name of Font Awesome icon. social: GitHub:https://github.com/hzzzzzzzq||fabfa-github E-Mail:mailto:hzzzzzzzq@gmail.com||fafa-envelope #Weibo: https://weibo.com/yourname || fab fa-weibo #Google: https://plus.google.com/yourname || fab fa-google #Twitter: https://twitter.com/yourname || fab fa-twitter #FB Page: https://www.facebook.com/yourname || fab fa-facebook #StackOverflow: https://stackoverflow.com/yourname || fab fa-stack-overflow #YouTube: https://youtube.com/yourname || fab fa-youtube #Instagram: https://instagram.com/yourname || fab fa-instagram #Skype: skype:yourname?call|chat || fab fa-skype
我们在自己的主题文件目录下,找到 next/layout/_macro/post.njk,并将以下该代码,添加到 body 之后,footer 之前。
1 2 3 4 5 6 7 8
{#####################} {### END POST BODY ###} {#####################} {%- if theme.post_end_tag.enable and not is_index %} <divstyle="text-align:center;color:#bfbfbf;font-size:16px;"> <span>-------------------- 本文结束 </span> <iclass="fa fa-{{ theme.post_end_tag.icon }}"></i> <span> 感谢阅读 --------------------</span> </div> {%- endif %}
我们来看效果:
打赏功能
我们打开配置页面,并找到 reward。
1 2 3 4 5 6 7 8 9 10 11 12
reward_settings: # If true, a donate button will be displayed in every article by default. enable:true# 是否开启打赏 默认 - false animation:true# 是否有动画 默认 - false comment:Buymeacoffee
creative_commons: # Available values: by | by-nc | by-nc-nd | by-nc-sa | by-nd | by-sa | cc-zero license:by-nc-sa# 版权许可协议 # Available values: big | small size:small sidebar:false# 侧边栏设置版权 post:true# 在文章底部设置版权 - 一般使用这个 # You can set a language value if you prefer a translated version of CC license, e.g. deed.zh # CC licenses are available in 39 languages, you can find the specific and correct abbreviation you need on https://creativecommons.org language:zh-CN
我们来看看版权添加效果:
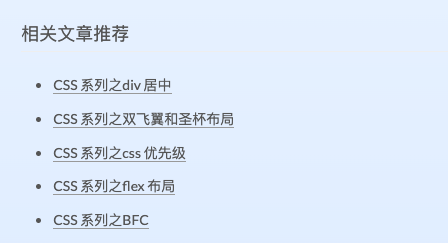
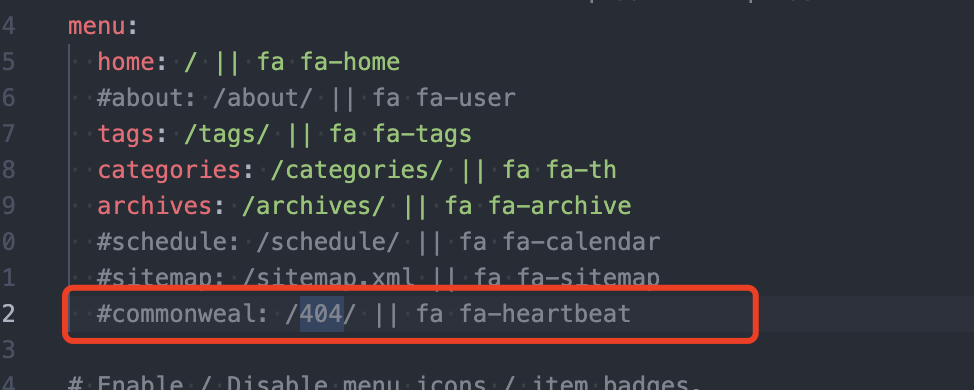
相关文章推荐
首先需要安装插件
1
$ npm install hexo-related-popular-posts --save
在主题配置文件中,找到这段代码,然后将 enable 修改为 true,将 title 改为相关文章推荐。
1 2 3 4 5 6 7 8 9 10 11 12
# Related popular posts # Dependencies: https://github.com/tea3/hexo-related-popular-posts related_posts: enable:true title:相关文章推荐# Custom header, leave empty to use the default one display_in_home:false# 首页是否显示 params: maxCount:5# 相关文章显示的最大上限 #PPMixingRate: 0.0 # 相关度 #isDate: false # 是否显示日期 #isImage: false # 是否显示配图 isExcerpt:false# 是否显示摘要
这样之后,我们就可以在文章的底部看到了。
标签添加 tag 图标
要注意,新版中的文件都是采用的 njk 而我为了展示代码色彩,使用的 是 html 来展示这段代码。
注释方式是不同的,njk 使用的注释是 ``,html 使用的是 <!-- -->。
1
2
3
4
5
6
7
8
9
10
11
12
13
14
15
16
17
{%- if post.tags and post.tags.length %} {%- set tag_indicate = '<i class="fa fa-tag" ></i >' if theme.tag_icon else '#' %} <divclass="post-tags"> {%- for tag in post.tags.toArray() %} <!-- 改动前 --> <ahref="{{ url_for(tag.path) }}"rel="tag" >{{ tag_indicate }} {{ tag.name }}</a > <!-- 改动后 --> <ahref="{{ url_for(tag.path) }}"rel="tag" ><iclass="fa fa-tags"></i>{{ tag.name }}</a > {%- endfor %} </div> {%- endif %}